Productivity

workit

Try to manage two projects at once. Add two young kids, renovating the garden and some hobbies. Make sure to be present on social media, keep you knowledge up-to-date and innovate for your boss. The list goes on … How not to get lost? How to become more productive? Where to start?

Here are my tips and tricks for better productivity.

RescueTime

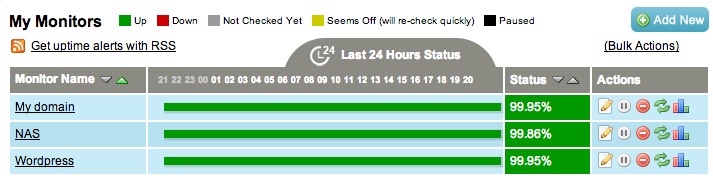
First I installed RescueTime – Time Management & Productivity tracking software. This logs the time spent in every program, webpage or idle time. The free version does the job very well. Now you know where you are spending your time and can do something about it. My top improvements were:

  • Check for mail only twice a day. Unpin Outlook from the taskbar to stick with the schedule.
  • Stop being to present on social media. Stop using hootsuite on your work PC. Use Twitter on your iPhone when at the coffee machine. Start using buffer to even out your own stuff.

Keep using this to improve on a regular basis!

GMail

Next start using your gmail account more. Not only is gmail the best webmail client out there with 10Gb of space, you can automate your tasks and when gmail is not up for it you can use IFTTT to do the job. Some examples I use:

Google has more apps like calendar which I use for reminders from event noted before Evernote put it in the new MAC/IOS version.

Evernote

We all know Evernote but I recently started using it more with The Secret Weapon. This described a best practice how to use evernote on a higher level. In short you tag posts with When, What, Who and Where and have an Action Pending and Completed notebook. I added the manifest to evernote with the !Daily tag.

Also read some (e)books about Evernote. The Trunk has a good list of what is out there.

IFTTT

I’ve written about If This Than That before. I mostly use it to send new RSS items to my Pocket reading list.

Pocket

As mentioned above I use Pocket as my reading list. It integrates with a lot of apps and supports all platforms (with web as fallback) Again I can automate with IFTTT.

Video

I shifted from reading to viewing when learning. YouTube and vimeo are the websites I turn to. Also reviews for products and bringing back memories are there. When I mark a video for Watch Later it is added to my Pocket reading list with an IFTTT receipt.

Grovo contains instruction videos for Tools like Evernote, Twitter, Facebook, IFTTT and many more. Again the free account is enough to get you started.

Other stuff

Posted in Tooling | Tagged , , , , , , , , , , , , , | 1 Comment

Visual Studio Load Test with fiddler

In Visual Studio you add a new Web Performance Test and Internet Explorer opens with the plugin to record the traffic. But what if you want to use another client that not lives in the browser like a Desktop App? Then you can record everything with fiddler (you know how) and export the traffic to Visual Studio Web Test.
export all sessions

The best way to use fiddler for Web Performance Testing is to start fiddler before you start the Desktop App. After starting the app use the crosshair to limit the traffic capture to that app. Remove traffic that already was captured and you don’t want in your test. Now do your thing and quit the App when your done.

You’ll end up with all traffic captured in fiddler. Export all sessions and use the Visual Studio Web Test format. Add this file to your Web Performance Test project.

Use find-and-replace to parameter tests. The parameter must be in format {{ContextParameter}}. I use this for the servername in the URL, the portnumber in the URL and the sessionId (something my program uses) in the requests. The first response message contains this sessionId, so I Add Extraction Rule to assign the value of a XML tag.
extraction rule in test

You set the values for the other Context Parameters in the test run settings by adding the Context Parameter.
Load test scenario Run Settings with Context Parameters

Now you can run the Load Test and simulate the traffic from the Desktop App.

Posted in Test | Tagged , , , , , , | 7 Comments

Resolve certificate error for Synology Diskstation part 4 of 4

My Synology NAS allows the use of SSL to encrypt traffic. The default certificate supplied works, but gives an exception in the browser: There is a problem with this websites security certificate. The problem is the address and the certificate don’t add up. So the solution is to setup your own domain, link it to your NAS and create a certificate for it.

Other parts

Monitor your domain

Checking your domain is up-and-running is as simple as typing the url in any browser. But why do this yourself every 5 minutes when online tools can do this for you.

This post lists some free uptime monitoring web applications. I picked uptime robot for my sites. It is still free :mrgreen: and offers up to 50 monitors of websites, ports, pings and keywords. Whenever there is no response you can get notified by e-mail, push, rss, twitter or sms. When the site is back up, you’ll get notified again.

On the My Monitors tab you see the current state of the monitors and the uptime in percentages. I added the monitors after the first post, that is why the uptime is not 100%. uptimerobot my monitors tab

The alerts go to my freshdesk e-mail address and are processed there. More about freshdesk in a future post.

Note that the used domain FINDMYNAS.NL is not mine and only used for demo purposes because it was available at the time I created this post.

Posted in Security | Tagged , , , , , , , , , , | 5 Comments

Resolve certificate error for Synology Diskstation part 3 of 4

My Synology NAS allows the use of SSL to encrypt traffic. The default certificate supplied works, but gives an exception in the browser: There is a problem with this websites security certificate. The problem is the address and the certificate don’t add up. So the solution is to setup your own domain, link it to your NAS and create a certificate for it.

Other parts

Create your SSL certificate

Finally the point of all this work. The SSL certificate for your own domain and access to the NAS. For this I use startssl which is free :mrgreen:
UPDATE 21 March 2017: don’t use startssl anymore


  1. Head over to startssl and goto Control Panel. Start the Express lane or Authenticate when you’ve already signed up.
  2. The Express lane guides you through the signup process and starts the Validations Wizard. When you authenticated/signed in you can start the Validations Wizard now.
  3. Choose Domain Name Validation and continue

    Domain Name Validation

  4. Enter the domain name (findmynas.nl) and continue

    Enter Domain Name

  5. Select the e-mail address to use for verification and continue. This is why I always have a catch-all e-mail (* for namecheap).

    Select Verification Email

  6. Copy-and-Past the verification code from the e-mail into the field and continue

    Complete Validation

    Now the domain is verified and the SSL can be generated.

  7. Start the Certificates Wizard. Choose Web Server SSL/TLS certificate and continue

    Select Certificate Purpose

  8. Enter and confirm a Password, leave the keysize and algorithm to the defaults and continue

    Generate Private Key

  9. Now you need to save the encrypted private key by Copy-and-Past to a plain text file.

    SavePrivateKey

    Since I’m doing this from a MacBook I execute the openssl rsa -in ssl.key -out ssl.key command in terminal. There is a tool in the Tool Box that can do this for you online.

  10. Select your domain (findmynas.nl) and continue

    Add Domains

  11. Enter the subdomain setup for DDNS and continue

    AddSubDomain

  12. Confirm your choices on the next step and continue
  13. Now you need to save the encrypted certificate by Copy-and-Past into a plain text file.

    Save Certificate

    Also save the intermediate and root CA certificates: the bolt texts in the wizard are links to the files you need.

  14. Now login to your NAS and goto Control Panel > DSM Settings tab Certificate and choose Import certificate. Select the files you’ve created above.

    dsm certificate

  15. Add the root CA certificate to your keychain/certificate store by double clicking and importing it to Trusted Root Certification Authorities.

Now you can access your synology NAS over the internet without the certificate Error.

Note that the used domain FINDMYNAS.NL is not mine and only used for demo purposes because it was available at the time I created this post.

Posted in Security | Tagged , , , | 22 Comments

Resolve certificate error for Synology Diskstation part 2 of 4

My Synology NAS allows the use of SSL to encrypt traffic. The default certificate supplied works, but gives an exception in the browser: There is a problem with this websites security certificate. The problem is the address and the certificate don’t add up. So the solution is to setup your own domain, link it to your NAS and create a certificate for it.

Other parts

Setup DDNS for your NAS

My ISP charges extra for a fixed IP address. To get around this you can setup DDNS, dynamic DNS. Your NAS updates the address it is available on right in the DNS of your domain.

Since godaddy.com does not provide DDNS I’m using namecheap.com.

  1. Go to the namecheap FreeDNS product and search for your domain.
    search domain
  2. Hit search and when it can be hosted at namecheap you can Add DNS Service for Selected Domains. Don’t update the nameservers now!
    add selected domain
  3. Go to the hosted domains and select findmynas.nl to view the details. Use the select authorization email to speed up the process. This is why you should not have updated the nameservers in the previous step, your e-mail would not have worked.
    modify domain
  4. When the e-mail arrives click the link in it and authorize namecheap to host the domain.
  5. Now update the nameservers on godaddy.com to
    • FREEDNS1.REGISTRAR-SERVERS.COM
    • FREEDNS2.REGISTRAR-SERVERS.COM
    • FREEDNS3.REGISTRAR-SERVERS.COM
    • FREEDNS4.REGISTRAR-SERVERS.COM
    • (see the changing digit after FREEDNS?)
      The godaddy support article Setting Nameservers for Your Domain Names explains the details.

  6. Now you’ll have to wait for the changes to spread all over the internet 😉
  7. Somewhere in the near future the DNS status will update to active. Go to the hosted domains and select findmynas.nl to view the details.
  8. Go to the Dynamic DNS settings and enable it. Note the password.
  9. Go to the All Hosts Records and add a subdomain. This will be the record the NAS updates.
    Host Name IP Address/URL Record type
    synology 127.0.0.1 A (Address)
  10. On your NAS install the DDNS Updater and setup DDNS. Details on synology forum.
    Provider http://www.namecheap.com
    Hostname synology
    Login findmynas.nl
    Password ******************** (from Dynamic DNS in namecheap)
  11. Again wait some time as DNS is probably cached at your ISP. Now the NAS is accessible on http://synology.findmynas.nl
  12. Don’t forget to setup the e-mail fowarding with namecheap.

Note that the used domain FINDMYNAS.NL is not mine and only used for demo purposes because it was available at the time I created this post.

Posted in Security | Tagged , , , , , , , , | 14 Comments